
Over the past many years, Inmantec Institutions faced issues managing their IT infrastructure. Problems like managing static IP pools for students and staff. Managing internet bandwidth, to avert users from misusing the internet bandwidth and many more. Here’s a first hand account of how open source helped the institute manage their IT infrastructure efficiently and in cost-effective way.
![]()
For years, we used commercial software to manage our IT infrastructure. As all commercial software, this software also did not give us the customized solution. We need to manage our students and staff IP addresses efficiently. Since in static IP address case we were provided with four VLANs for all our students of different courses and staff. Most of the time every range IP addresses were used to be free. These large static IP address pools had performance issues in that commercial software. We required features like captive portal, DHCP server, users download and upload monitoring with real-time statistics,etc. With all these issues in our mind we then tested different open source software and found Zentyal server, which resolved most of our issues. We tested it for 6 months. I will discuss some of the advantages and issues after installing zentyal. It is a Linux-based business server, which is a replacement for Microsoft small business server and Microsoft exchange server. The beauty of the software is its simplicity, less installation time, less maintenance time. The number of features those attracted us towards Zentyal are mentioned below:-
- Communication Server, which has mail server, groupware and instant messaging system.
- Office Server, which has LDAP directory server, file sharing and domain services, printer sharing and backup facility.
- System Management, which has software management utility and monitoring of hardware performance.
- Infrastructure, which has DHCP server, DNS server, NTP server, Certification authority, Apache webserver, FTP server and UPS management.
- Gateway and UTM, which has configurable network interfaces, high availability, advanced routing, advanced firewall, Traffic shaping and QOS, Advanced HTTP proxy server, Captive portal, RADIUS server, VPN, Intrusion Prevention System and mail filter.
These modules of Zentyal are customizable and can be hand-picked at the time of installation to suit your needs. With these features we can control most of our infrastructure management needs and manage them efficiently.
In this tutorial I will explain setup of Zentyal server 3.4. I will take different two different scenarios first a live scenario and second a test scenario. Those users who do not have a spare server hardware to use they can test run it on Virtualbox, for testing purpose.
Scenario-1:
Setup Zentyal on production server.
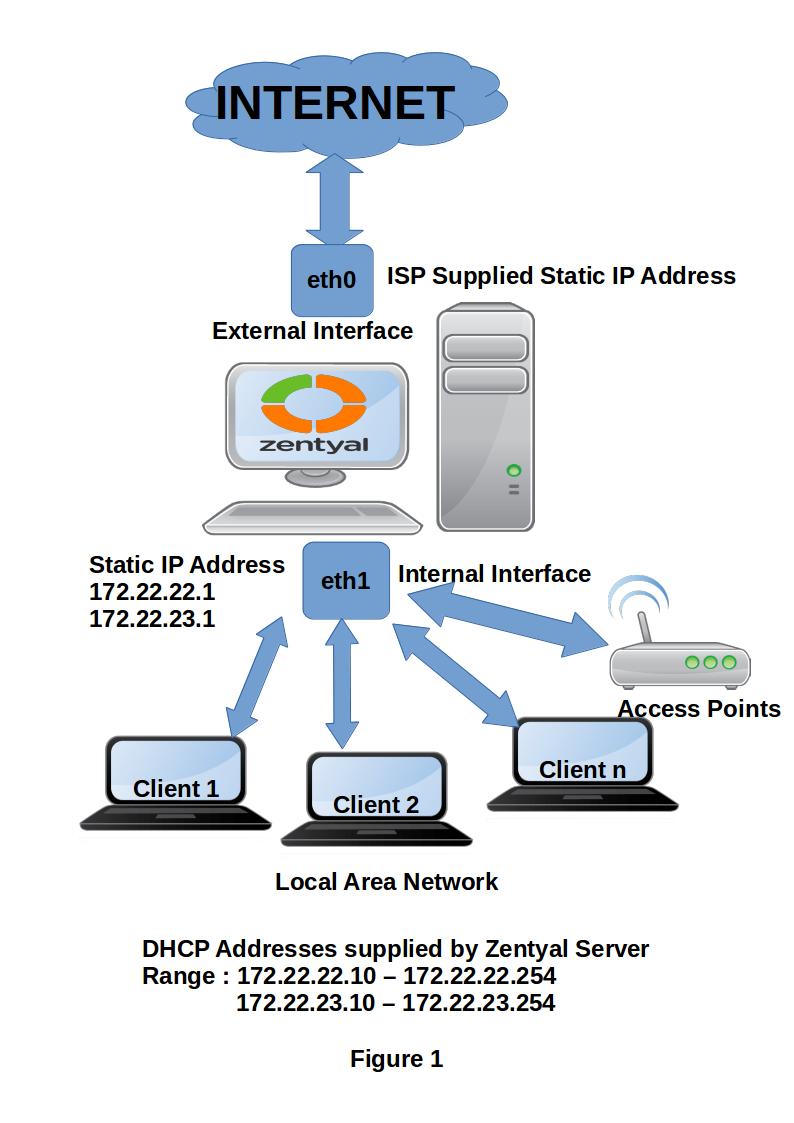
This first scenario is explained in figure 1.
Hardware requirements:
A 32/64 bit hardware, 2 network interface cards, 500 GB of hard disk space.
Software requirements:
Zentyal 3.4 32/64 bit server.
Scenario – 1
In Figure 1 we can see that the server is having two interface cards eth0 and eth1. The interface eth0 is connected to ISP, with a static address, and eth1 is connected to LAN. LAN interface is used to supply IP addresses to clients using a DHCP server. Interface eth1 is assigned two local IPs 172.22.22.1 and 172.22.23.1 for serving two VLANs(Virtual LANs). Each IP address range has some IPs reserved for our internal use, those we can assign it to our internal servers, copiers, printers,etc and rest range is used to supply to our clients.
These range of IP addresses can serve upto 490 clients.
How?
Lets take an example. IPv4 addresses are have four classes A,B,C , D and E. I will take class B and C address for explanation.
[table caption=”Table -1″ width=”100%” colalign=”center|center|center|center|left” class=table-bordered]
IP Class, Start Address, End Address, Subnet Mask, Reserved Address, Explanation
B,172.22.22.0,172.22.22.255,255.255.255.0,172.22.22.0,Network Address [/table]
As defined in Table1, every IP range first address is assigned as network address and end address as broadcast address. The rest of the IP addresses are used to address hosts in the network. More explanation can be found here[IP].
To provide IP addresses automatically to our clients, in our network, we use DHCP server. We also use local domain to provide names to our devices. Names are easier to remember than IP address. So, if one wants to access any device from the network, just use device name and not IP address. We have set IAMT as our local domain name. We also use captive portal, a portal which will authenticate user on the domain for its authenticity. This portal is also used to provide download quota for each person. This quota is used as a limit for internet bandwidth usage.
Scenario-2:
Setup Zentyal server for testing purpose.
Hardware requirements:
A 32/64 bit laptop/Desktop, 2 virtual network interface cards, 20 GB of hard disk space.
Software requirements:
Zentyal 3.4 32/64 bit server, Virtualbox
 Users who want to test this server on their local machines can use Virtualbox for testing purpose. Virtualbox, settings are bit different. Scenario-2 can be used to visualize from figure 2.
For Virtualbox internet is shared with host operating system, therefore primary virtual interface(eth0) of guest Zentyal server operating system has to be set as DHCP not static, as defined in earlier scenario. To setup Virtualbox on windows follow the tutorial on site. Remaining process of setup is same as defined in scenario-1.
Since, we have now setup the basic understanding of the scenario, we can go ahead for our installation.
Installation
Installation of Zentyal Server
To setup Zentyal server follow the steps defined:-
1. Download Zentyal 3.4 from the site.
2. After Download burn the image on CD. For Virtualbox you can use image directly. Select 64bit or 32 bit version, as per the server requirements.

3. Select language. Choose English or any other language.

4. You can install Zentyal with default settings by selecting “Install Zentyal 3.4(delete all disk). This step will install Zentyal with GUI. By selecting expert mode Zentyal can be installed in text mode.

5. Select language again required for the setup. In our case “English”.

6. Choose your timezone settings. In our case “India”.

7. Choose keyboard layout. In our case its “no”

8. Choose Configure the keyboard as “English US”.

9. Choose Keyboard Layout as “English US”.
10. Afterwards it will detect hardware and start loading more components.
11. Choose “eth0” as primary network interface.

12. It will then configure the network interface. To setup the network interface manually. Select cancel after IPv6 configuration. For virtualbox do not press anything.

13. Now choose continue. To manually configure the network.

14. Now type in the IP address give by your ISP. For Virtualbox users this step is not used.

15. Type the netmask, as supplied by your ISP.For Virtualbox users this step is not used.

16. Provide the gateway, as supplied by your ISP. For Virtualbox users this step is not used.

17. Type nameservers. In our case we used Google Open DNS3. Do not use commas for more than one name server, use space instead.

18. It will then ask for hostname. Type Server Name you want to have. Default is “zentyal”.

19. Next it will ask for domain name. You can type any domain name like test.com or in my case iamt.

20. Installation will ask for username of administrator of the system. Type any name.

21. Type the password for the administrator account and confirm the password.

22. It will then start the installation process. After the installation ends system will reboot.

23. After system reboots you will be asked to give the username and password. After that you will be required to install the modules required for your server. To install the modules click on the different modules available. We have selected all the modules. Click install button to install the modules.

24. After the installation finishes. Installation process will not complete your network settings. Select eth0 as external interface and eth1 as internal interface.

25. Next we have to add IP addresses to the interfaces. As defined in scenario1. We have added the IP addresses to the interfaces. For Virtualbox users use DHCP for eth0 and same IP address for eth1.

26. Next screen will ask for domain name to be used for the local LAN. We can use default domain or use our own.

27. Next process will ask for virtual mail domain name. We can use the same domain that we have set in the earlier step.
28. Now, you are ready to configure your server as per your needs with the Zentyal dashboard.

In the next article, I will explain about the configuration of DHCP server, DNS and captive portal.
I hope you enjoyed the article.
Leave a Reply
You must be logged in to post a comment.